
If you’ve landed on this page, you must have been asking yourself “What is surface-mounted wiring?” Well, you’ve come to the right place. Also referred to as electrical raceways, surface-mounted wiring is essentially wiring that allows you to run electricity to ceiling or wall-mounted fixtures like fans and sconces without having to cut into your walls to power them.
What Is Surface Mounted Wiring and How Do I Install It?
Surface wiring is a clever electrical hack that is a convenient and easy way for homeowners and DIY’ers to install fixtures without causing structural damage to the surrounding interior. Some professionals call surface wiring “Wiremold” even though that term is technically a proprietary brand of the Legrand company.
Wiremold is a type of molding that can be used for cable and surface wiring. The wire has different thicknesses and depths depending on how it will be installed, with plastic being less expensive than metal because it requires more insulation to protect it against outside elements like moisture, which could cause short circuits.
You’ll be able to find all the necessary parts you’ll need to install surface-mounted wiring at your local hardware store and most home centers. We suggest choosing plastic channeling/molding because it’s easier and cheaper than metal, as well as easier to cut. You’ll also need wire connectors in various sizes so you can easily connect different wires effectively.
Even though surface wiring is just a simple system of channels and boxes, it doesn’t mean you won’t need to have a little wiring know-how to safely tackle this job. Keep in mind that if you’re adding outlets to an existing circuit, you need to be mindful of what kind and how many appliances will be pulling from that particular power source. We suggest not overburdening your circuit breakers by plugging in demanding appliances like hair dryers or space heaters, as it may cause the breaker to trip.
Lastly, if you decide that installing a surface mounted electrical box and wiring is within your skill level, you’ll need a permit. You’ll be able to review every step with an electrical inspector when you go to apply for your permit. He or she will be able to answer detailed questions for you prior to installation. And always have your work inspected upon completion. Let’s get to what you’ll need to install a surface mounted electrical box and wiring.
Installing Surface Mounted Electrical Box & Wiring in 5 Steps
Before we begin, here are the tools and materials you’ll need to install surface mounted wiring and electrical box…
Tools Required
- 4-in-1 screwdriver
- Drill
- Hacksaw
- No-contact voltage tester
- Utility knife
- Wire stripper or wire cutter
Materials Required
- Channel system
- Cover plates
- Electrical wire
- Hollow wall anchors
- Receptacles
- Wire connectors
Step 1:
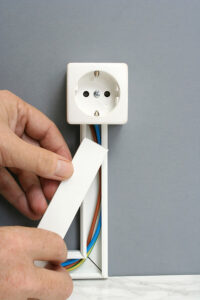
Begin by mounting the box base near an existing outlet. This outlet will be the one you’ll draw power from. Next, turn the power off to the outlet. Use your voltage detector to ensure that the power running to the outlet is indeed off. Now you need to remove the old outlet and affix the box base to your junction box. Before screwing the back panel to the junction box, you’ll need to cut the back panel of the box with your utility knife. Grab your trusty stud finder and locate the studs in the wall, make them with a washable marker or painter’s tape.
Step 2:
Now you’ll want to run the channel to the first outlet location. Depending on what it is used for, we recommend running it along a baseboard or molding so you can easily conceal the channel. Follow the studs to guide you and if you land on a location that doesn’t have a stud, use a drywall anchor to affix to the wall. When you finish the first section of channel, affix the box base to the wall.

Step 3:
Surface wiring can extend in one direction or up to three directions, up and down walls or around corners. It’s up to you.
Step 4:
Now you’ll want to join all hot wires, ground wires, and neutral wires. Then add your ‘pigtails’ to the corresponding terminals on the outlet.

Step 5:
Time to install the wiring by running wire to each box base from the existing junction box. You must be sure to match the same size wiring to existing wiring. This is where the labeled notches on your wire stripper come in handy. You can gauge the diameter of the existing wire to ensure it is an exact match. You’ll need three different colored wires – green for grounding, white is neutral, black or red are the hot wires. These individual wires, which can be purchased at any hardware store, should be labeled ‘THHN,” and are typically sold in spools.
You’ll likely have fewer wires if you kept it simple and just ran a channel in a single direction from one box. No matter the complexity the steps remain the same. Join all of the neutral wires together, join the hot wires together, and the ground wiring together. When you reach the final box in the sequence, you should be down to three wires. Connect those three wires directly to the new outlet and you should be ready to go.
Contact a Professional Electrician For Help With Surface-Mounted Wiring
Installing surface-mounted wiring does get tricky. You may need the help of a licensed electrician. Express Electrical has expert electricians that can help with any surface-mounted wiring projects as well as inspect your work when complete. We hope you learned from our step-by-step guide. For emergency electrical service, don’t hesitate to call Express Electrical Services for help. Call 805-242-9564 for service in Los Angeles County, Orange County, Ventura County, or the Inland Empire.